Battle of Graspan: A Strategic Clash of the Second Boer War
The Battle of Graspan, also referred to as the Battle of Enslin, was a significant military engagement during the Second Boer War. Fought on November 25, 1899, near the Enslin railway station in the Orange Free State, the conflict pitted the British Empire against the Boer republics. The battle centered around the Graspan kopje—a small, flat-topped hill characteristic of the South African landscape—which served as a strategic defensive position for the Boer forces.
The engagement was a pivotal moment in Lord Methuen's attempt to push British forces forward along the railway line toward Kimberley, testing the resolve and tactics of both the British infantry and the highly mobile Boer commandos.
Key Facts
- Date: November 25, 1899
- Location: Near Enslin, Orange Free State
- Outcome: British victory
- British Commander: Lord Methuen
- Boer Commander: Koos de la Rey
- British Casualties: 20 killed, 165 wounded
- Boer Casualties: Approximately 200 killed
The Road to Graspan
Following the Battle of Belmont, Lord Methuen advanced his forces along the railway using armored trains. However, on November 24, Boer artillery positioned in the surrounding hills shelled the train, causing it to derail. This disruption forced Methuen to shift his strategy; he determined that the Boer positions had to be cleared to ensure the continued advance of his troops.
The Engagement of November 25
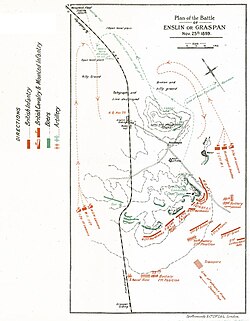
The assault began on the morning of November 25, with the 9th Brigade moving north toward the Graspan kopje. The British advance was immediately met with fire from a Boer pom-pom (an automatic cannon) and four 75mm Krupp guns. This initial barrage resulted in the deaths of five British regulars and two horses.
The British responded with overwhelming firepower, utilizing 12-inch naval guns to quickly silence the Boer artillery. Once the Boer guns were suppressed, Methuen used a heliograph—a wireless telegraph that signals by reflecting sunlight—to order the Coldstreams, Scots, and Grenadiers to advance from Belmont to Graspan.
The Infantry and Naval Advance
At approximately 7:00 am, the Guards Brigade, alongside the Northamptonshires and Northumberland Fusiliers, pushed up the railway toward the hill. A specialized Naval brigade was also deployed, consisting of sailors from the HMS Doris, HMS Terrible, and HMS Powerful, supported by a battalion of Royal Marines.
Because the Guards Brigade had been heavily engaged at the Battle of Belmont only two days prior, they were initially held in reserve. The primary assault was led by the fusiliers and light infantry. The Naval brigade, however, advanced in an exposed position. Lacking the specific experience of the regular infantry in facing Boer tactics, the sailors suffered significant casualties during their approach.
The Final Assault
Utilizing the natural cover of rocks and tall grass, the British forces made dashing advances toward the kopje. While Boer riflemen managed to pick off several soldiers, they could not halt the momentum of the British charge. Eventually, the Guards reached the base of the hill and stormed the Boer positions.
The intensity of the charge caused some Boer forces to retreat, while others remained to hold the line as long as possible. Ultimately, the British encircled the position and infiltrated the trenches, forcing the remaining Boers to retreat toward the Modder River.
Battle Summary
| Feature | United Kingdom | Boer Forces (SAR & OFS) |
|---|---|---|
| Commanders | Lord Methuen | Koos de la Rey |
| Troop Strength | 8,000 | 2,000 |
| Artillery | 16 field guns (incl. 12-inch naval guns) | 5 field guns (incl. 75mm Krupp) |
| Casualties | 20 killed, 165 wounded | ~200 killed |
Aftermath and Legacy
The victory at Graspan allowed Lord Methuen to continue his advance toward Kimberley. This progression led to the Battle of Modder River on November 28, where Methuen again emerged victorious despite sustaining heavy casualties. However, the British momentum was eventually halted by a disastrous defeat at the Battle of Magersfontein.
To commemorate the bravery of the Royal Marines during this engagement, a memorial was constructed and dedicated in 1903.
Frequently Asked Questions
What was the primary objective of the Battle of Graspan?
The primary objective was for Lord Methuen to clear Boer forces from the Graspan kopje to secure the railway line and continue the British advance toward Kimberley.
Why did the Naval brigade suffer high casualties?
The Naval brigade suffered heavily because they advanced in an exposed position and were not as accustomed to the specific guerrilla-style fighting and terrain tactics used by the Boers compared to the regular infantry.
How did the British silence the Boer artillery?
The British used powerful 12-inch naval guns to counter the Boer pom-pom and 75mm Krupp guns, effectively silencing them before the main infantry assault.
What happened to the Boer forces after the battle?
After being encircled and having their trenches infiltrated by British forces, the Boer troops were forced to retreat toward the Modder River.
What was the significance of the armored train in this battle?
The armored train was the primary means of British transport and supply along the railway; its derailment due to Boer shelling on November 24 was the immediate catalyst for the assault on the Graspan kopje.