Battle of Abu Tellul: The Defense of the Jordan Valley
The Battle of Abu Tellul, referred to by the British Battles Nomenclature Committee as the "Affair of Abu Tellul," took place on July 14, 1918. This engagement was a critical clash during the Sinai and Palestine Campaign of World War I, occurring after German and Ottoman forces launched an attack on the British Empire garrison stationed in the Jordan Valley.
The valley had been under the control of the Egyptian Expeditionary Force (EEF) since the capture of Jericho in February 1918. Following strategic raids east of the River Jordan in March and April, the responsibility for defending the valley was transferred to the Desert Mounted Corps.
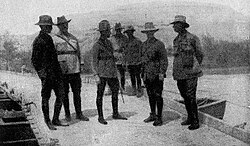
Key Facts
- Date: July 14, 1918
- Location: Palestine, specifically the Abu Tellul and Mussallabeh ridges.
- Outcome: British Empire victory.
- Allied Forces: United Kingdom, Australia, and India.
- Opposing Forces: German Empire and Ottoman Empire.
- Casualties: Approximately 1,000 German/Ottoman casualties vs. 189 British Empire casualties.
Strategic Landscape and Military Situation
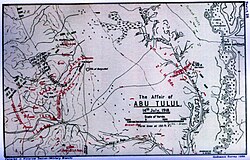
The center of the conflict was the Abu Tellul ridge, a strategically vital position on the west bank of the Jordan River. Together with the Mussallabeh ridge to the north, these heights formed a salient—a piece of land that juts out into enemy territory—in the British defensive line.
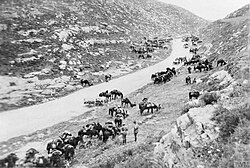
The Australian and New Zealand garrison fortified the area with sangars (defensive breastworks made of piled stones or dug-out earth), spaced between 400 and 1,000 yards apart. To hinder enemy movement, the ravines between these posts were laced with barbed wire, while British artillery batteries remained concealed just south of the ridge.
Tensions Between Allies
Leading up to the battle, relations between the German and Ottoman allies deteriorated. Ottoman leadership believed German units were being withdrawn to the Caucasus. While some movements occurred, reinforcements actually arrived in Palestine from Caucasia, including the 37th Division. However, diplomatic ties were severely strained in May 1918 when Enver Pasha expanded the Ottoman presence in Georgia, violating the Treaty of Brest-Litovsk.
The Forces Involved
The Attacking Force
The combined German-Ottoman force was substantial, consisting of the German 702nd and 703rd Battalions, a battalion of the 146th Regiment, and a company of the 11th Jäger Regiment (specialized light infantry). They were supported by the Ottoman 24th and 53rd Divisions, the 32nd, 58th, and 163rd Regiments, and two regiments of the 3rd Cavalry Division. Notably, a group of 100 Germans were equipped with 42 automatic rifles.
The Defending Force
The defense was anchored by the 1st Light Horse Brigade, with the 1st Light Horse Regiment serving as the reserve. They were supported by a diverse array of artillery, including the 1/1st Nottinghamshire Royal Horse Artillery, the Honourable Artillery Company, and mountain batteries from the 10th (Irish) Division. Other units included the 2nd Light Horse Brigade at Wadi Mellaha and the New Zealand Mounted Rifles Brigade in divisional reserve.
The Jordan River fords at Makhadet Hijla and El Hinu were held by the Mysore and Hyderabad Lancers, while the Ghoraniyeh bridgehead was garrisoned by the Alwar and Patiala Infantry Battalions.
The Assault on Abu Tellul and Mussallabeh
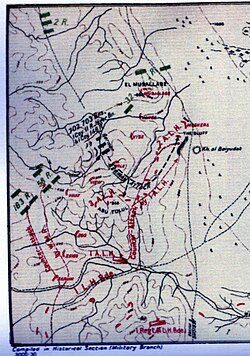
The attack began shortly after 01:00 on July 14, with Ottoman artillery shelling the ridges. By 03:30, approximately 1,250 German troops attacked the Mussallabeh salient. During the initial chaos, the 2nd Light Horse regimental headquarters narrowly escaped capture by relocating to Abu Tellul West.
The German advance was thwarted by a series of mutually supporting defensive positions. As German troops attempted to cut through the wire, they were caught in devastating crossfires. On the left flank, the Ottoman 32nd Regiment captured a post at Mussallabeh, but it was quickly retaken. Three subsequent Ottoman attempts were repelled by machine-gun fire, resulting in roughly 200 dead.
On the right flank, an attack by the Ottoman 58th Regiment on View post failed spectacularly when a sentry shot the leaders; one soldier reportedly burst into flames due to incendiary bombs, acting as a "human torch" that illuminated the remaining attackers for the defenders.
The Counter-Attack
At 04:30, the 1st Light Horse Regiment launched a counter-attack to clear the center of the line. By 08:00, they retook "The Bluff," where only three of twenty Australian defenders remained unwounded. Simultaneously, the Wellington Mounted Rifle Regiment drove back the Ottoman 163rd Regiment from Vaux post.
Action at Wadi Mellaha
In a display of aggression, a small troop from the 5th Light Horse Regiment conducted two daring raids. In one instance, 14 men attacked a group of 150 Germans, capturing 15 prisoners. A second raid involving 20 men resulted in 25 enemy dead, 30 wounded, and up to 45 captured.
Cavalry Operations at the Jordan Fords
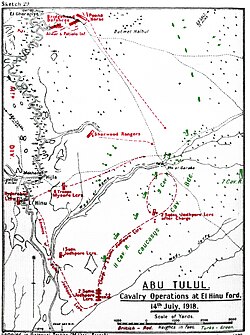
While the infantry fought on the ridges, a cavalry battle unfolded at the river. The Jodhpore and Mysore Lancers discovered an Ottoman cavalry force advancing toward the El Hinu ford. Supported by two Australian Light Car Patrol armored cars, the Imperial Service Cavalry Brigade launched a counter-attack.
At 10:30, the Jodhpore Lancers charged the Ottoman flank in extended order. They crashed into the enemy, spearing several soldiers and capturing 50 prisoners before coming under heavy machine-gun fire. Later, the Sherwood Rangers Yeomanry and Poona Horse joined the fray, eventually forcing the Ottoman cavalry to withdraw by 17:30.
Battle Summary and Aftermath
| Category | British Empire Forces | German & Ottoman Forces |
|---|---|---|
| Total Casualties | 189 | Up to 1,000 |
| Prisoners Captured | 0 | ~540 (377 German, 71 Ottoman) |
| Key Units | 1st Light Horse Bde, Jodhpore Lancers | German 702nd/703rd Bns, Ottoman 24th Div |
| Outcome | Victory | Defeat |
The victory was short-lived in terms of peace; on July 16, the 1st Light Horse Brigade was subjected to a massive artillery bombardment of over 1,500 shells. This attack, guided by spotter planes, caused heavy casualties among the horses. The 1st Light Horse Brigade was eventually relieved by the 3rd Light Horse Brigade under the cover of darkness.
This engagement served as a prelude to the larger Battle of Megiddo on September 19, which effectively ended the war in the Middle Eastern theatre.
Frequently Asked Questions
What was the primary objective of the German-Ottoman attack?
The attacking forces aimed to seize the British Empire garrison in the Jordan Valley, specifically targeting the strategic ridges of Abu Tellul and Mussallabeh to break the defensive line.
Who were the primary combatants in the Battle of Abu Tellul?
The battle involved the British Empire (specifically Australian Light Horse, New Zealand Mounted Rifles, and Indian cavalry units) against the combined forces of the German Empire and the Ottoman Empire.
What role did the Jodhpore Lancers play?
The Jodhpore Lancers conducted a daring cavalry charge across the Jordan River at the El Hinu ford, spearing Ottoman cavalry and capturing prisoners to secure the river crossings.
Why were the defenses at Abu Tellul so effective?
The defenders used a combination of stone sangars, barbed wire, and mutually supporting positions that created lethal crossfires, making it nearly impossible for the attackers to advance without heavy losses.
What happened immediately after the battle?
Following the victory on July 14, the British positions were heavily shelled by Ottoman artillery on July 16, causing significant losses among the horses before the 1st Light Horse Brigade was relieved.