Tirah Campaign: The British-Indian Expedition of 1897-1898
The Tirah campaign, also known as the Tirah expedition, was a significant military operation conducted by the British Empire in British India between September 1897 and April 1898. The conflict took place in the Tirah Valley, a rugged and mountainous region located in what is now the Khyber Pakhtunkhwa province of Pakistan (formerly the Federally Administered Tribal Areas).
The campaign was characterized by difficult terrain, extreme weather, and a persistent guerrilla war waged by local tribes against a numerically superior but geographically challenged British-Indian force.
Key Facts
- Duration: 3 September 1897 – 4 April 1898.
- Location: Tirah Valley, British India.
- Outcome: British-Indian victory.
- British Strength: 34,882 soldiers and 20,000 camp followers.
- Opposing Strength: Estimated 40,000 to 50,000 Afridi and Orakzai tribesmen.
- British Casualties: 1,150.
The Roots of Rebellion
The conflict began when the Afridi tribe rose in rebellion. For sixteen years, the government of British India had provided the Afridi with a subsidy to ensure the safety of the Khyber Pass (a strategic mountain pass connecting Afghanistan and British India). To further secure the area, the government had maintained a local regiment composed entirely of Afridi tribesmen.
The stability collapsed when the tribesmen suddenly revolted, seizing all posts in the Khyber Pass held by their own countrymen and attacking forts on the Samana Range near Peshawar. A notable event during this phase was the Battle of Saragarhi, where tribesmen led by the Orakzai Chief Gul Badshah attacked a British fort.
Before launching the main expedition into Tirah, British authorities first addressed a separate Mohmand rising located northwest of the Khyber Pass.
The British Advance
October Operations
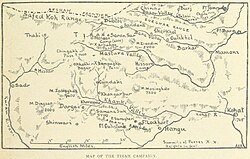
General Sir William Lockhart, commanding the Punjab Army Corps, led a force of 34,882 men and 20,000 followers. Using Kohat as the campaign base, the army advanced along a single line starting on 18 October.
Early fighting focused on the Dargai Heights. While initially captured without difficulty, the positions were abandoned due to a lack of water. They were stormed again on 20 October, resulting in 199 British casualties. The advance continued through the mountains, facing stiff resistance at the Sampagha Pass on 29 October and the Arhanga Pass on 31 October.
November Maneuvers and Guerrilla Warfare
By November, the force split into detached brigades to traverse the Tirah district and destroy fortified Afridi hamlets. Approximately 20,000 men were assigned to this duty. Brigadier-General Westmacott first attacked Saran Sar; though the position was taken easily, the subsequent retirement resulted in 64 casualties. A second attack on Saran Sar on 11 November, led by Brigadier-General Gaselee, saw only three casualties due to improved tactical dispositions.
On 13 November, Brigadier General Francis James Kempster led a brigade through the Tseri Kandao Pass into the Waran valley. While the advance was simple, the rearguard faced heavy fighting during the return march on 16 November, resulting in 72 casualties. Throughout the month, the Afridi avoided general engagements, instead employing guerrilla warfare—a form of irregular warfare involving small-scale ambushes—against foraging and survey parties.
Further operations included a difficult expedition to the Rajgul valley under Westmacott and a punitive mission against the Chamkannis, Mamuzais, and Massozais led by Gaselee. On 29 November, shots fired into the headquarters camp injured two of Sir William Lockhart's escorts, including the Rajput Nobleman Pratap Singh of Idar.
Winter Withdrawal and Surrender
In December, General Lockhart began the evacuation of Tirah. The force was split into two divisions: one under Major-General W. Penn Symons returning via the Mastura valley, and the second under Major General Yeatman Biggs and Lockhart moving through the Bara valley.
The withdrawal began on 9 December amidst intense cold, with temperatures dropping to 21 degrees of frost. While Symons' route was largely unopposed, the 34-mile march through the Bara valley was grueling. Between 10 and 14 December, troops faced snow, sleet, rain, and an icy stream. This phase involved some of the hardest fighting of the campaign, with significant casualties among the troops and many camp followers dying from exposure.
Once the divisions joined the Peshawar column, the British took possession of the Khyber forts. Facing the threat of another spring expedition, the Afridis eventually surrendered their rifles and agreed to pay fines. The expeditionary force was officially disbanded on 4 April 1898.
| Category | Details |
|---|---|
| Commanders | Sir William Lockhart (British), Gul Badshah (Orakzai) |
| Primary Belligerents | British Empire/India vs. Afridi, Orakzai, and Chamkani tribes |
| Key Locations | Khyber Pass, Dargai Heights, Bara Valley, Tirah Valley |
| British Force Size | 34,882 soldiers + 20,000 followers |
| Tribal Force Size | 40,000 – 50,000 men |
| Final Result | British-Indian victory; tribal surrender of rifles and payment of fines |
Frequently Asked Questions
What caused the Tirah campaign?
The campaign was triggered by a rebellion of the Afridi tribe, who had previously been paid a subsidy by the British-Indian government to protect the Khyber Pass. The tribesmen seized British posts and attacked forts on the Samana Range.
Who was the primary British commander during the expedition?
The campaign was led by General Sir William Lockhart, who commanded the Punjab Army Corps.
What were the main challenges faced by the British forces?
The British struggled with extremely difficult mountainous terrain, severe winter weather (including frost and snow), and the Afridi's use of guerrilla warfare and ambushes.
What was the significance of the Dargai Heights?
The Dargai Heights were a strategic position commanding the line of advance. They were captured twice, with the second storming on 20 October resulting in 199 casualties.
How did the conflict eventually end?
The conflict ended when the Afridis agreed to pay fines and surrender their rifles after the British successfully evacuated the valley and threatened a second expedition in the spring of 1898.