High Wood: The Bloody Struggle of the Somme 1916
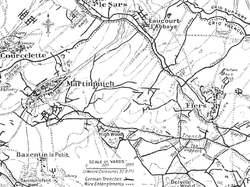
During the First World War, few locations became as synonymous with attrition and carnage as High Wood (known to the French as Bois des Foureaux). Situated on a ridge overlooking the surrounding terrain in the département of the Somme, France, this small patch of woodland became a focal point of intense fighting between July and September 1916. Its strategic elevation made it a vital objective for the British Army and a formidable stronghold for the German Empire.
The wood sat atop a ridge approximately 100 feet (30 meters) high, providing the defenders with a clear view of any advancing forces. Before the onset of the Battle of the Somme, the area was characterized by undamaged trees and firm ground, but it would soon be transformed into a wasteland of shell-craters and mud.
Key Facts
- Timeline: 14 July – 15 September 1916.
- Location: Adjacent to Longueval, Somme, France.
- Outcome: British victory.
- British Casualties: Approximately 13,111 in High Wood and the vicinity.
- German Casualties: Approximately 9,498 (incomplete records).
- Strategic Feature: A 100-foot ridge providing dominant observation of the surrounding battlefield.
The Battle of Bazentin Ridge (July 14–15)
The struggle for High Wood began on 14 July during the Battle of Bazentin Ridge. While German forces initially abandoned the wood, British delays in occupation allowed German reserves to arrive and launch several counter-attacks. By the evening of 14 July, the 7th Division managed to secure the southern half of the wood.
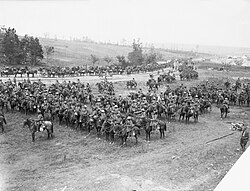
The engagement saw the involvement of the 2nd Indian Cavalry Division, including the 20th Deccan Horse, who struggled across devastated ground to establish a line from Longueval to the southern corner of the wood.
By 15 July, the situation grew chaotic. Misinformation led German commanders to believe a major British breakthrough had occurred, prompting General Fritz von Below to commit several divisions for a counter-attack. However, the British 91st Brigade was eventually stopped by lethal machine-gun fire from the Switch Line—a key German defensive position running through the wood. By 11:25 p.m., the British judged the position untenable and withdrew, leaving the wood to be bombarded by artillery.
The War of Attrition: Late July to August
Throughout late July and August, the battle devolved into a series of costly, small-scale assaults. On 20 July, the 19th Brigade captured most of the wood, only to lose the northern end to a German counter-attack. The environment became increasingly hostile, with heavy rain and fog complicating operations.
A significant tactical shift occurred on 22 July when British reconnaissance aircraft discovered a new German Intermediate Line—a trench system dug several hundred yards in front of the Switch Line. This discovery forced the British to revise their objectives. A subsequent attack by the 51st (Highland) Division on 23 July resulted in 450 British casualties due to machine-gun fire and difficulties with artillery support, as guns firing over Bazentin Ridge suffered from low elevation and accuracy issues.
August was marked by continued instability. British forces, including the 15th (Scottish) Division, repeatedly entered and were forced out of the wood. On 9 September, the 178th Tunnelling Company detonated a mine containing 3,000 lb (1,400 kg) of ammonal to clear German positions, though the resulting crater was quickly recaptured by Bavarian forces.
The Final Capture: Battle of Flers–Courcelette
The deadlock finally broke on 15 September during the Battle of Flers–Courcelette. The 47th (1/2nd London) Division led the assault, supported by the New Zealand and 50th divisions. This attack was notable for the deployment of tanks—armored fighting vehicles designed to break the stalemate of trench warfare.
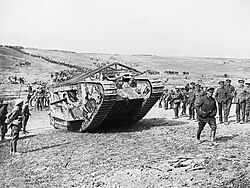
The tank deployment was fraught with difficulty. Due to incorrect map coordinates, the creeping barrage (a curtain of artillery fire that advances ahead of infantry) was fired too far forward. Of the tanks assigned, one ditched in the British line and accidentally fired on its own troops, another was set on fire by German infantry, and a third broke down in no man's land. Despite these failures, the enveloping attacks by the New Zealanders and the 50th Division eventually forced the German defenders out of the wood and the Switch Trench.
Casualties and Aftermath
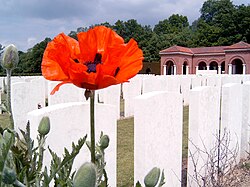
The cost of capturing High Wood was staggering. The 47th Division alone suffered over 4,500 casualties between 15 and 19 September. In total, it is estimated that at least 8,000 soldiers from both sides died within the wood in 1916.
| Unit/Force | Period | Estimated Casualties |
|---|---|---|
| 1st Division (British) | 11–27 July | 3,078 |
| 7th Division (British) | 14–20 July | 3,413 |
| 51st (Highland) Division (British) | 22 July – 7 Aug | 2,120 |
| 47th (1/2nd London) Division (British) | 15–19 Sept | 4,500+ |
| German 7th & 8th Divisions | 15–27 July | 9,498 |
Frequently Asked Questions
Why was High Wood so difficult to capture?
High Wood was situated on a 100-foot ridge, giving German defenders a commanding view of the terrain. This allowed them to use machine guns from the Switch Line and other defensive positions to devastate British infantry before they could reach the wood.
What was the "Switch Line"?
The Switch Line was a primary German defensive trench system that ran through High Wood, providing a fortified position from which the German army could launch counter-attacks and repel British advances.
How did tanks impact the final capture of the wood?
While the tank deployment on 15 September was plagued by mechanical failures and navigation errors, the overall pressure from the tanks and the enveloping maneuvers of the New Zealand and 50th divisions eventually forced the German surrender of the position.
What role did the weather play in the fighting?
Weather conditions were often detrimental; heavy rain and fog frequently obscured visibility, making artillery coordination difficult and turning the battlefield into a mud-filled wasteland that hindered troop movements.
How many soldiers died in High Wood?
It is estimated that at least 8,000 British and German soldiers lost their lives within the wood during the fighting in 1916.