Battle of Colenso: A Decisive Boer Victory in the Second Boer War
The Battle of Colenso, fought on December 15, 1899, stands as one of the most significant British defeats of the Second Boer War. As the third and final engagement of the infamous "Black Week," this clash pitted the British Empire against the forces of the South African Republic and the Orange Free State. The battle is remembered not only for the tactical victory of the Boers but as a case study in the dangers of inadequate reconnaissance and rigid leadership.
The conflict centered around the town of Colenso in Natal, South Africa, where Boer forces had established a formidable defensive line to block the road and railway leading to the besieged British garrison at Ladysmith.
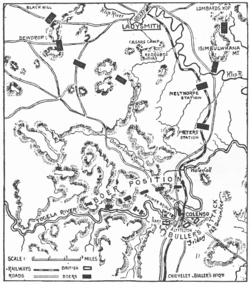
Key Facts
- Date: December 15, 1899
- Outcome: Decisive Boer victory
- British Commander: General Sir Redvers Buller
- Boer Commander: Louis Botha
- British Casualties: 143 killed, 755 wounded, 240 missing
- Boer Casualties: 8 killed, 30 wounded
- Key Loss: 10 British guns captured by Boer forces
Strategic Background
General Sir Redvers Buller had been appointed Commander-in-Chief of British Forces in South Africa with the primary goal of relieving the besieged forces in Ladysmith. Upon arrival, Buller faced a fragmented front with limited communication between garrisons. To reach Ladysmith, he had to cross the Tugela River, which the Boers had fortified at Colenso.
Initially, Buller planned a flank march to cross the river at Potgieter's Drift, 80 kilometers upstream. However, news of British defeats at Stormberg and Magersfontein pressured him to act quickly. Fearing isolation, a lack of transport animals, and the loss of telegraph communications, Buller abandoned the flank maneuver in favor of a direct frontal assault.
Opposing Forces and Tactics
The Boer Defense
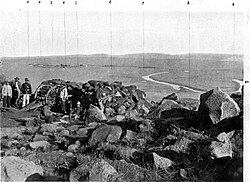
Commanded by Louis Botha, the Boer forces were organized into commandos—local fighting units consisting of men from specific districts led by an elected Commandant. Botha utilized nine commandos and the Swaziland Police.
The Boer strategy relied on camouflage and geography. They deployed forces north of the river to cover the drifts (fords) and occupied a strategic hill called Hlangwane south of the river to enfilade the British flank. Their plan was to hold fire until the British were mid-crossing, maximizing the impact of their rifle fire.
The British Offensive
Buller's force was substantial but hampered by a lack of competent staff officers and poor mapping. He relied on a crude sketch map and a blueprint based on railway surveys, which proved disastrously inaccurate.
The attack was split into several components:
- The 5th (Irish) Brigade: Tasked with crossing at the Bridle Drift.
- The 2nd Brigade: Tasked with occupying Colenso village.
- Mounted Infantry: Led by Lord Dundonald to capture the Hlangwane hill.
- Artillery Support: Including field batteries and naval 12-pounder and 4.7-inch guns.
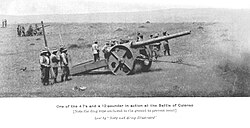
The Course of the Battle
The engagement began with a two-day artillery bombardment that failed to hit the camouflaged Boer trenches. On the morning of December 15, the British offensive collapsed due to a series of critical errors.
Major General Arthur Fitzroy Hart led the 5th Brigade toward the river, but a non-English speaking guide led them to the wrong ford—the Punt Drift. Trapped in a loop of the river and misled by Buller's inaccurate map, the brigade became an easy target. The Boers opened fire, inflicting over 500 casualties before the troops could be extricated.
Simultaneously, the British artillery under Colonel Charles James Long deployed too close to the Boer lines. Exposed and without adequate ammunition resupply, the gunners were forced to take cover in a donga (a dry stream bed). Meanwhile, the mounted infantry were pinned down at the foot of Hlangwane, unable to advance.
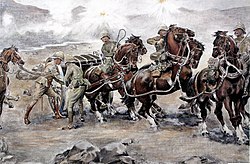
Realizing the failure, Buller took direct control and called off the battle. He personally attempted to recover the abandoned guns, but while two were saved, ten others were left behind and captured during the night.
Aftermath and Legacy
The defeat at Colenso led to Buller being replaced as Commander-in-Chief by Field Marshal Lord Roberts a week later, though Buller remained in command in Natal. It took several more months and further battles—including the disastrous Spion Kop and the eventual victory at Tugela Heights—before Ladysmith was finally relieved on February 28, 1900.
Despite the defeat, the battle saw extraordinary individual bravery. Four soldiers were awarded the Victoria Cross for rescuing guns under intense fire: Captain Walter Congreve, Captain Harry Norton Schofield, Corporal George Nurse, and Lieutenant Frederick Roberts, the latter of whom died from his wounds shortly after.
| Feature | British Empire | Boer Forces |
|---|---|---|
| Commanders | Redvers Buller | Louis Botha |
| Infantry/Troops | 14,000 infantry, 2,700 mounted | 4,500 |
| Artillery | 44 guns | Not specified |
| Killed | 143 | 8 |
| Wounded | 755 | 30 |
| Equipment Loss | 10 guns captured | Minimal |
Frequently Asked Questions
Why did the British lose the Battle of Colenso?
The defeat was caused by a combination of inadequate reconnaissance, poor mapping, and uninspired leadership. Specifically, the British were led to the wrong river crossing and deployed their artillery within easy range of Boer riflemen.
What is a "commando" in the context of the Boer War?
A commando was the basic Boer fighting unit, consisting of all available fighting men from a specific district, led by an elected Commandant and administered by a Feldcornet.
What was the significance of Hlangwane hill?
Hlangwane was a strategic height south of the Tugela River. Because it dominated the surrounding landscape, the Boers used it to fire upon the flanks and rear of the British forces attempting to cross the river.
Who was awarded the Victoria Cross at Colenso?
The Victoria Cross was awarded to Captain Walter Congreve, Captain Harry Norton Schofield, Corporal George Nurse, and Lieutenant Frederick Roberts for their gallantry in rescuing British guns under heavy fire.
How did the battle affect the relief of Ladysmith?
The defeat delayed the relief of Ladysmith significantly. It forced the British to rethink their strategy, eventually leading to a successful outflanking maneuver at Tugela Heights and the relief of the town in February 1900.